
Back when Carol and I lived here in the ’90s and early oughts, I had a large lot and a 200-foot wire antenna for the low bands. The antenna didn’t work well…because what I didn’t have was a good ground. Now that we’re back in Arizona, I decided to begin with the ground system, and work up from there toward the antennas.
The problem with Arizona is that it’s dry. No surprise there; in Spanish, Arizona means “dry zone.” At our house on the far north end of the Phoenix metro area, I simply drove an 8′ ground rod into the soil next to my workshop/shack, and clamped a length of #8 solid copper wire to the rod. I figured it would work. It didn’t. The problem (surprise!) was the dry soil, which left the ground rod practically insulated. It was better than nothing, but it certainly couldn’t touch the grounds I’ve had out east, especially the ground I had in Rochester NY. The difference is that I had a swamp at the back of our lot in Rochester, and a climate that delivered rain probably a third of the year. My ground rod was set in soil so wet it was actually mud most of the time that it wasn’t frozen. Tricky to grow vegetables in (our strawberries did well) but man, my Hy-Gain 18 AVT took me around the world.
This time, I did some detailed reading on ground systems, and enlisted the help of Joe Flamini W4BXG, who is a EE and has been licensed longer than I have. I ran the plan past Joe, who approved. This past Saturday, I finished it.
So. The basic idea is to increase the conductive area of a ground rod, so that it connects to a greater area than the area of a 5/8″ diameter rod. From a height, you do this:
- Dig a round hole.
- Drive the ground rod down into the soil at the center of the bottom of the hole.
- Put a length of PVC pipe in which you’ve drilled a large number of holes into the hole beside the ground rod.
- Fill the hole with sodium bentonite clay, moistened with an ionic solution like Epsom salts.
- Keep the bentonite and the soil around it a little damp. (This is what the hole-y pipe is for.)
Now let’s go through what I did in detail.
I had our landscape company bring out an earth auger. I expected something a little smaller, having looked around at tool rental firms. This one had a 12″ auger 48″ long. It took just 15 minutes, and I was glad I didn’t have to control the monster myself.
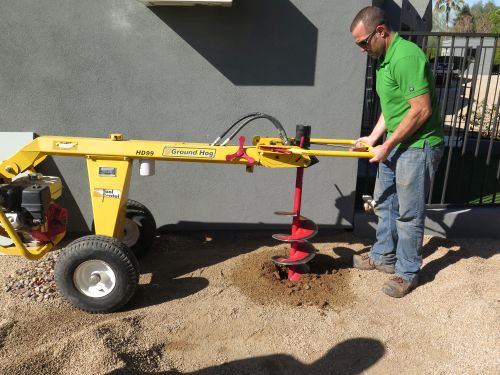
Earth augers are not tidy things. In fact, the hardest single part of the project was using an improvised scoop on a long handle to get the last of the loose dirt out of the bottom of the hole. Nor was the hole completely straight. Still, it was straight enough.
Next, I took the ground rod and used my bench grinder to sharpen its point:

I then used steel wool to brighten the copper the full length of the rod. This makes it more conductive, which is the whole idea. Having brought it to a nice bright polish, I took out my five-pound sledge and drove the rod into the center of the hole. I had previously bought a 4′ length of threaded 1/2″ schedule 80 PVC pipe, and drilled holes every inch down the full length of the pipe. Each drill pass cut two holes, giving me two rows of holes on opposite sides of the pipe. I put PVC caps on both ends, and positioned the pipe in the hole with an artfully bent coat hanger.
 I had done the math on the volume of the hole and the density of bentonite clay, and calculated that I would need four 50-pound bags of bentonite powder. I bought it from a drilling supplies firm on the west side, for $8 a bag. (Bentonite has many uses, and one common use is borehole mud.) Some people mix a bentonite slurry in a wheelbarrow and then tip the slurry into the hole, but I didn’t have a wheelbarrow. What I did is fill the hole by pouring in a layer (3″ or so) of bentonite powder, and then wetting it with water in which I had dissolved ten pounds of Epsom salts. I stirred the goop a little with a metal rod to make sure all the powder got wet.
I repeated this layering process until the hole was full. Miraculously, my 200 pounds of bentonite clay powder filled the hole to within 2″ of the rim. Enough, and none left over. (Math works!) Once I filled the hole and wet the top layer down, I forced water into the moistener pipe with a pressure nozzle, taking advantage of Phoenix’s relatively high water pressure. The idea is to make sure that all of the powder becomes mud.
A few notes on bentonite powder: It’s as fine as talcum powder, and blew around in Saturday’s unfortunate wind while I poured it. I wore a mask to keep from inhaling it. When wet, it becomes a slippery, slimy-feeling mess that clings to everything it touches. I was very glad I didn’t try to mix a slurry outside the hole. Bentonite gloms onto water, and over time, the clay in the hole will become uniformly damp. I’ll sprinkle the hole with the garden hose periodically, and pour some additional Epsom salts solution into the moistener pipe.

I’ve been soaking it each day, not only the bentonite but also the soil around it. Bentonite expands slightly when wet, and will force itself into all the tiny voids in the interface between the soil and the bentonite fill. In my neighborhood we have the advantage (for ground systems at least) of a septic system, which distributes a different sort of ion solution into the soil. I’m expecting far better soil conductivity here than we ever had in our ’90s house.
That’s pretty much it. I have no antennas mounted yet, so I can’t test it for the time being. No problem; once I have my feed-throughs in place, I’ll run a length of wire up to one of the palm trees, and see how well my IC-736 loads. Jim Strickland suggested building a simple crystal radio using a germanium diode, of which I have many in the drawer. Crystal sets are very dependent on a good ground, as I discovered in my distant youth. If I can bring in local AM stations well, I’ll consider the ground a success. The ultimate goal is to get a ground-mounted trap vertical, like the 18-AVT or similar. In the meantime, I know how to get a lot out of 75′ of copper wire worked against a good ground.
And now, for the first time in a fair number of years, I have a good ground!


I expect you have sort of plan for a radial system for a/the vertical. I have (and once used, different location more suited) a trap vertical for 75/80,40,20,15, & 10 that had been passed along many times, each time a bit less money changed hands until one swapnet I snagged “for the hauling away” because “verticals never work.” But I dug in a radial system (oh, so much TV antenna rotator control cable – one thing I will miss about Radio Shack is the ‘just go into town and get it’) for all covered bands and did some SWR adjustments… and soon had my first DX contact, with Suriname. The antenna was “free” but the contact was earned.
Yes, but until I decide exactly where my proposed trap vertical is going to be sited, I can’t do much about radials. I had no trouble working Japan on my 18 AVT in 1980 without any radials at all. It may help to have a swamp for a ground plane.
Cycle 21 was the best (and my first as a radio amateur; I guess what they say is true 🙂
I worked Great Britain on 6m FM using a random 6-8′ piece of cattle fence for an antenna.
I used phased 1/4wl verticals on 40m back in the 90’s. Started with 3 measured ground radials per, but then just started attaching random lengths as I obtained them. Takeoff angle was reduced appreciably. But I also had no near-field obstructions. I’m not sure how important ground radials are in a typical environment, except for improving feedpoint impedance.
Since you have a grinding wheel, why did you use steel wool to polish the rod? A buffing wheel with pumice or some other polishing compound would probably be faster and more effective.
Just because I am OCD, I probably would have worked the surface with very coarse sandpaper first, then polished. This would have increased surface contact area enormously. Overkill, probably, but OCD overkill.
And thank you for the tutorial.
Two reasons, actually: 1. Space is very tight in my workshop, and I don’t have the room to grind every inch of an 8′ ground rod. I barely had enough clearance to grind the end to a sharp point. 2. This is a good idea, but I didn’t think of it. Given that I’m more a ragchewer than a contester, I think what I put together will work more than well enough.
No doubt, and consider yourself fortunate that you don’t worship at the temple of OCD.
Even in the well watered south good grounds can be a problem. Clay “soil” with solid gneiss rock about 5 or 6 feet down is less than ideal. Trying to drive an 8 foot rod through solid rock is hard and the domestic use of high explosives is frowned on these days. I used a network of three 4 foot ground rods 8 or 9 feet apart in a rough triangle all tied together with heavy bare ground wire buried between them. As recommended that network is also tied into the utility ground for the house with a short run of heavy ground wire. Final enhancement was to route the AC drain line to the ground rod that is the primary lighting ground so that it would stay wet during our summer droughts, This is the third year since I put it in and it seems to have worked pretty well.
Interesting project. Thanks for sharing it. I’ll be putting up a 160m inverted L this Spring and, having little enthusiasm for burying a lot of radials, I’m going to try it running it against a K2AV folded counterpoise, basically a single, folded, elevated radial. We’ll see how well it works.
If I do end up installing a radial field, I’m going to see if I can rent one of those gas-powered wire-layers that the invisible dog fence people use.
I would have run a wire to the water supply as it enters the house. I have city water, so it connects to the grid of water pipes in the street. If you have a well it would connect to the pump some few hundred feet in the ground, unless the well used plastic tubing. I think it is code to ground the pump so the ground wire going down to the pump would be a perfect ground. You could pick that up from where the box that connects the box to the pump. If all this fails, the power line from the street has a ground that should be good so just connect the ground wire to the main fuse box ground.
That’s what I’ve done in other houses, especially in Rochester NY, where the copper pipe cold water line entered the basement right next to my station bench. In our current house, the water line enters the building at the diametric opposite corner, about 80 or 90 feet away from the station. So this may be the best I can do.
Update on the “Bentonite Ground” – vertical antenna system?
BTW, for some reason, Bentonite made me think of Benton Harbor, Michigan, home of the famous Heathlit company!
Any news on the antenna system?
No, not yet. We had family down for most of a week, and other issues intervened. I have a 10′ mast and tripod for the roof over the shack, and will mount by discone and possibly a 6M ground plane atop that. Not sure yet. For the low bands I have a “canned” dipole on the shelf that I used in Colorado, but it doesn’t fit well between any two trees on the property. I’m still not sure where to put the trap vertical.
So there’s still a fair bit of conceptual work to be done. I’ll report back here as matters progress.