Jeff Duntemann's Contrapositive Diary Rotating Header Image

electronics

The Not-So-Fondly Farenheit Tuner

AH3 and AH4 tuners - 500 Wide.jpg

I’ve been slow to come up to speed on the radio front since we’ve moved here. Until March 2017 we were bouncing back and forth between Phoenix and Colorado Springs, furiously working on both houses, one to sell, and the other to live in. Given that I was trying to write a new novel during that time (and was now in my mid 60s) time was tight and personal energy scarce. But more to the point, I wanted to do it right. Most of the trouble I had with my station when we lived here in the 90s was a lousy ground system. A year or so ago I took the time and built a Bentonite ground with a water pipe down the full depth of the Bentonite to keep it wet, ideally with Epsom salts in solution. The ground rod is right next to the entry box through which all my cables go through the wall of the small garage where my station is.

With the ground in place, I strung 75′ of #16 solid copper between one of my two big palm trees and the mast on the roof of the garage, where the TV antenna used to be. On the mast I mounted my venerable Icom AH-3 autotuner. I had to make an extension cable for the control line, which was only 16 feet long, but the cable path was close to 30. The antenna was finished and in place, in fact, a few weeks prior to getting the entry box mounted. Once I got the coax, ground, and control cables into the garage, I took a break (it was a hot job up there on the roof in the actinic Arizona sunlight) and came back after supper. Fired it up and everything worked like a champ. Worked a guy in Colorado, called it victory, read for an hour, and collapsed into bed. Didn’t get back to the station until the next day.

So late morning I turned everything on, selected 20 meters, and pressed the Tuner button on the front panel of my IC-736.Tink! The rig’s meter needle slammed against the high peg. Whoa. Didn’t do that last night. I tightened all the cables, ran up the ladder to look at the mast setup, and tried again. NFG. I checked the cables for shorts, re-checked all the connections to the ground bus inside the garage, but no joy. I let it set and went back to my office to get some words in on Dreamhealer. That night after supper I went back out there and tried the tuner. Shazam! Everything worked! I didn’t hear much traffic, sunspots being what they weren’t, but the AH-3 tuned my longwire and the IC-736 was happy. I worked a couple of guys and heaved a sigh of relief.

The next day I bopped back into the shack after an hour or two writing, and scanned the bands to see what was live. Heard very little on 20m. Switched to 40. Hit the Tune button. Tink!

I was starting to see a pattern: Works at night. Craps out during the day. Hmm. I opened up the tuner and saw nothing obviously amiss. That said, I had bought the AH-3 in 1992, and it had spent the rest of the 1990s out in the sun, matching my 180′ longwire, lousy ground notwithstanding. It got plenty hot during the day, and I worked plenty of stations all day, irrespective of temperature. Alas, electronics don’t live forever.

I did try a few things. I modified a cardboard moving box into a sunshield and placed it over the tuner so that the bottom of the box faced south and the flaps taped open. The AH-3 was thus shaded entirely but still open to the air. On a whim I put the sensor unit for our wireless thermometer inside the box with the tuner. With the carboard box in place, it worked for a little while longer–maybe another hour–after full sun hit the box. I did a lot of testing and temp recording over the next day and a half. Results: It worked until the air temp hit ~90F. Then, Tink!

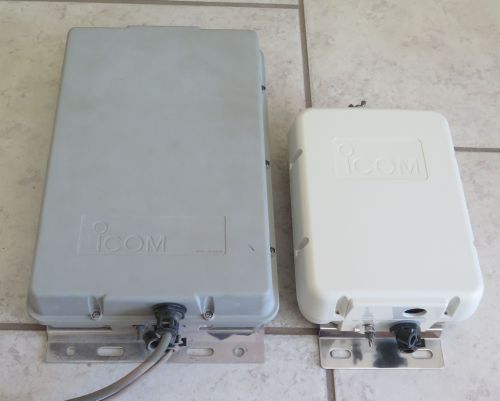
Hell, I’ve been a ham now for 46 years. I fix things. I used to fix things for a living, in fact. But at some point I realized that troubleshooting an intermittent 28-year-old tuner was becoming a bad use of my time. Icom had released a newer but compatible tuner ten or twelve years ago. I found a place online selling NOS AH-4s at a discount (Gigaparts in Las Vegas, if you’re interested) and ordered one.

The AH-4 is a little over half the size of the AH-3. I still had to make a custom control cable, but with that done it works like a champ, even in the noonday sun. Granted, it’s not summer here anymore. We’ll see how it performs next June. But in the meantime, I have 75 feet of wire working against a good ground. A guy can do a lot with that alone.

I do intend to get a vertical for the higher bands. The longwire will remain for 40, 80, and 160. (The AH-4 tunes the wire easily on 160. The AH-3 had trouble sometimes, even during the night.) My (not yet purchased) vertical will be ground-mounted close to the ground rod. If I need a few radials I’ll throw them in. At that point the antenna farm will be mostly complete. I have a VHF discone but I also want a 6-meter vertical somewhere, and there’s more thinking to be done about what goes where.

My other ham radio project is still incomplete: An uninterruptible 12V power supply system to run my IC-729 mobile HF rig and shack lighting. With AC power, the panel will draw on a 30A 12V supply I built back in the 1990s. If mains power drops, power will automatically switch to a battery supply of some sort. Near-term, probably gel cells trickle-charged off mains power. Ultimately I want to put a couple of panels up on the roof and buy a husky lithium-ion pack like those sold by Goal Zero. More on that as it happens. It’s the first time I’ve ever used Anderson PowerPole connectors, about which I have mixed feelings. But like everything else in electronics, the journey is the education, and the results are the reward. This time it’s been slow coming together, but better slow than never.

More as it happens.

Monthwander

I haven’t been darkening my own doorway here much over the last month. Part of it is an aversion to political posts. The left has made just about everything political in one dimension or another. Topics are not as common as they once were. It was also a quiet January with (thankfully) few crises to report. We spent a considerable amount of time getting ready for The Big Backyard Overhaul, which begins tomorrow. I’ll take some photos and vids of the demolition of our waterfall and our pool, which is having its deep end removed. The waterfall was nothing special: a jumble of mini-boulders in an aggregate of mortar. It looked like somebody dumped a few tons of granite in a pile and then just slopped mortar into the cracks. The boulder pile is there to prevent people from installing a diving board. At least for us, they needn’t have worried. I did all the diving I think I ever want to do in college swim class.

K7JPD is creeping back toward the air so slowly that I’d characterize it as being under the air rather than on the air. I’m still researching compact antennas. In the meantime, I’m going to run a 60-70′ longwire to one of our tall palms, and match it with my Icom AH-3 tuner. I have two very good Icom radios: an IC-729 purchased in 1991, and an IC-736, purchased in 1995. The IC-729 is an odd bird: It was designed to be a mobile HF rig, and it runs off 12VDC. Alas, although smaller than your typical HF rig, I couldn’t conveniently fit it into our minivan, so I built a 30 amp 12V supply and used it on my bench until I bought the 736. Since the 736 arrived, the 729 came out of the box only once a year, for Field Day. I assume it still works, and I’ll find out soon, if not as soon as I had hoped.

The AH-3 is a great tuner. I used it at our North Scottsdale location in the 90s, feeding a 180′ longwire out to the corner of our 2.5 acres. I had a crappy ground there and so the longwire didn’t do as well as other, shorter longwires I’ve had in the past. I really hope the AH-3 still works, because if it doesn’t, there’s a problem: The 729 and the 736 can’t connect to Icom’s newer autotuners. I have a solid manual tuner, but the way the AH3 sits there and clunks around for a few seconds assembling a match when you push the Tune button is borderline uncanny. I suppose I could get a newer radio, but newer radios are basically computers. I stare at computer screens all day. When I operate a radio, I want to handle actual dials, switches and knobs.

Switches, yes. There’s a parallel project to getting my radios back on the air here. I’m building a 12VDC system to power the IC-729, 12VDC LED light strips in the shack, and a few other things that work on 12V. The ultimate goal is to have something like a Goal Zero Yeti backup power unit, on trickle charge from the wall until I can put it on trickle charge from a couple of solar panels. In the meantime, the system will be powered by the 30 amp supply I built for the IC-729 in 1991.

The project involves a DC power control and distribution panel. I’m using PowerWerx fittings and Anderson Powerpole connectors. I’ve never used Powerpoles before. Nothing difficult about them, but it’s a new skill.

And then there’s the AH-3 tuner control cable problem. The tuner came with 16′ 4″ of control cable, and that’s not quite enough to get down off the roof of the shack and into the building far enough to reach the radios. So I have to work up an extension cable in Molex connectors and 4-conductor thermostat wire. I did a little bit of Molex work way back when I was a Xerox tech rep, but that was 40-odd years ago and I’m rusty. So I bought 15′ of 4-conductor thermostat wire at Ace, and ordered something I didn’t think was a thing: a kit of three pairs 4-pin Molex blocks and enough pins/sockets to fill them. I have a crimper, and when I get this posted I’m going out to the garage to make a 15′ extension cable.

A set of four glass dogbone insulators arrived a few days ago, and I have plenty of #18 copper wire. Nothing gets strung, however, until I see what sort of heavy equipment will be hacking up the backyard tomorrow and days following. There’s still plenty of room for things to go wrong, but with a little luck I should have the station back on the air by next weekend.

I get asked “How’s QBit doing?” a lot, and the answer is simply this: miraculously well. He was supposed to be dead five months ago, and yesterday he was still galloping around the backyard with the rest of the Pack while we played dog soccer. Carol has been keeping an eye on his lymph nodes, which seem to be back to their normal size. His appetite is certainly good, and while deaf, he’s otherwise in pretty decent shape for a dog who will be 14 this coming Friday. We don’t know how he beat cancer, if indeed he did beat it. We have our suspicions: Carol custom-makes dog food for all four of them out of ground beef or ground turkey, and vegetables. QBit likes it so much that I think he just told himself, “Like hell I’m going to die, if she’ll give me another bowl of this tomorrow morning!”

He’s just stubborn that way. Wonder who he learned that from.

Lazy LED Bulbs

Some months after moving into this house at the end of 2015, we went on a sweep and replaced nearly all of the incandescent bulbs with 2700K LED units. The drop in power usage was obvious from our monthly bills. However, I’ve had a whole lot of bulb failures within those three years. Some bulbs, in fact, didn’t even last out their first year. So much for 25,000 hours of service.

I’ve done teardowns on four or five dead bulbs, and found both dead power supplies and dead LED wafers. One of the power supplies was intermittent: Tap on it with the plastic handle of a screwdriver, and it will suddenly light its wafer again. Tap on it some more, and eventually the light will go out. The solder joints looked fine under my digital microscope. I even reflowed a few of them, but the unit’s behavior did not change.

However, the oddest failure mode we’ve experienced is this: bulbs that take longer and longer to illuminate after you flip the switch.

We have four ceiling can fixtures in our kitchen. During our LED sweep, we replaced the 75W incandescent floods with 75WEQ LED floods. A few months ago, I noticed that one of the bulbs took five or ten minutes to come on after flipping the wall switch. Once lit, the tardy bulb shone at identical light levels as the immediate bulbs did. Before it lit, it remained completely dark. (I.e., it spent no time at partial brightness.)

Well, as the months rolled on, the tardy bulb grew tardier and tardier. When it was up to about half an hour delay, a second bulb in the group of four started coming on late. A month or two after that, a third bulb in the group began delayed illumination. By that time, the first bulb would take almost two hours to light up. However, in every single case, all four bulbs eventually came up to full illumination from full dark.

I admit that once the second bulb started acting up, I put off replacing them to see what would happen. Yesterday I got tired of it, and replaced all four (even the one that still lit up immediately) with identical EcoSmart 75WEQ floods from Home Depot. The new floods produce five more lumens than the old ones but only draw 11.5 watts. (The originals drew 15 watts.)

I’m trying to figure out what sort of electrical failure would cause this. When time allows, I’m going to remove the plastic envelope from the original malefactor and take a close look. All of the bulbs I’ve cut open have used switching power supplies built into their bases. There is another kind of LED power supply: a capacitive voltage drop/rectifier system. (Wiki article here. More discussion here.) If the bulb uses a capacitive dropper, the capacitor is probably electrolytic. Electrolytics dry out over time (though it generally takes more than three years) and I’m wondering if poor-quality capacitors are at the heart of the problem. (Bad caps have caused trouble before. And again.) It’s not a time-constant thing, and in truth I don’t know what it might be, but doing a little probing will be fun.

And if any of my EE regulars know or have other (less wild-ass) guesses, I’d sure love to hear them.

How to Build a Bentonite Ground System

Back when Carol and I lived here in the ’90s and early oughts, I had a large lot and a 200-foot wire antenna for the low bands. The antenna didn’t work well…because what I didn’t have was a good ground. Now that we’re back in Arizona, I decided to begin with the ground system, and work up from there toward the antennas.

The problem with Arizona is that it’s dry. No surprise there; in Spanish, Arizona means “dry zone.” At our house on the far north end of the Phoenix metro area, I simply drove an 8′ ground rod into the soil next to my workshop/shack, and clamped a length of #8 solid copper wire to the rod. I figured it would work. It didn’t. The problem (surprise!) was the dry soil, which left the ground rod practically insulated. It was better than nothing, but it certainly couldn’t touch the grounds I’ve had out east, especially the ground I had in Rochester NY. The difference is that I had a swamp at the back of our lot in Rochester, and a climate that delivered rain probably a third of the year. My ground rod was set in soil so wet it was actually mud most of the time that it wasn’t frozen. Tricky to grow vegetables in (our strawberries did well) but man, my Hy-Gain 18 AVT took me around the world.

This time, I did some detailed reading on ground systems, and enlisted the help of Joe Flamini W4BXG, who is a EE and has been licensed longer than I have. I ran the plan past Joe, who approved. This past Saturday, I finished it.

So. The basic idea is to increase the conductive area of a ground rod, so that it connects to a greater area than the area of a 5/8″ diameter rod. From a height, you do this:

  • Dig a round hole.
  • Drive the ground rod down into the soil at the center of the bottom of the hole.
  • Put a length of PVC pipe in which you’ve drilled a large number of holes into the hole beside the ground rod.
  • Fill the hole with sodium bentonite clay, moistened with an ionic solution like Epsom salts.
  • Keep the bentonite and the soil around it a little damp. (This is what the hole-y pipe is for.)

Now let’s go through what I did in detail.

I had our landscape company bring out an earth auger. I expected something a little smaller, having looked around at tool rental firms. This one had a 12″ auger 48″ long. It took just 15 minutes, and I was glad I didn’t have to control the monster myself.

Drilling the Hole - 500 Wide.jpg

Earth augers are not tidy things. In fact, the hardest single part of the project was using an improvised scoop on a long handle to get the last of the loose dirt out of the bottom of the hole. Nor was the hole completely straight. Still, it was straight enough.

Next, I took the ground rod and used my bench grinder to sharpen its point:

Ground Rod - 500 Wide.jpg

I then used steel wool to brighten the copper the full length of the rod. This makes it more conductive, which is the whole idea. Having brought it to a nice bright polish, I took out my five-pound sledge and drove the rod into the center of the hole. I had previously bought a 4′ length of threaded 1/2″ schedule 80 PVC pipe, and drilled holes every inch down the full length of the pipe. Each drill pass cut two holes, giving me two rows of holes on opposite sides of the pipe. I put PVC caps on both ends, and positioned the pipe in the hole with an artfully bent coat hanger.

Moistener Pipe - 300 Wide.jpgI had done the math on the volume of the hole and the density of bentonite clay, and calculated that I would need four 50-pound bags of bentonite powder. I bought it from a drilling supplies firm on the west side, for $8 a bag. (Bentonite has many uses, and one common use is borehole mud.) Some people mix a bentonite slurry in a wheelbarrow and then tip the slurry into the hole, but I didn’t have a wheelbarrow. What I did is fill the hole by pouring in a layer (3″ or so) of bentonite powder, and then wetting it with water in which I had dissolved ten pounds of Epsom salts. I stirred the goop a little with a metal rod to make sure all the powder got wet.

I repeated this layering process until the hole was full. Miraculously, my 200 pounds of bentonite clay powder filled the hole to within 2″ of the rim. Enough, and none left over. (Math works!) Once I filled the hole and wet the top layer down, I forced water into the moistener pipe with a pressure nozzle, taking advantage of Phoenix’s relatively high water pressure. The idea is to make sure that all of the powder becomes mud.

A few notes on bentonite powder: It’s as fine as talcum powder, and blew around in Saturday’s unfortunate wind while I poured it. I wore a mask to keep from inhaling it. When wet, it becomes a slippery, slimy-feeling mess that clings to everything it touches. I was very glad I didn’t try to mix a slurry outside the hole. Bentonite gloms onto water, and over time, the clay in the hole will become uniformly damp. I’ll sprinkle the hole with the garden hose periodically, and pour some additional Epsom salts solution into the moistener pipe.

Pouring the Bentonite - 500 Wide.jpg

I’ve been soaking it each day, not only the bentonite but also the soil around it. Bentonite expands slightly when wet, and will force itself into all the tiny voids in the interface between the soil and the bentonite fill. In my neighborhood we have the advantage (for ground systems at least) of a septic system, which distributes a different sort of ion solution into the soil. I’m expecting far better soil conductivity here than we ever had in our ’90s house.

That’s pretty much it. I have no antennas mounted yet, so I can’t test it for the time being. No problem; once I have my feed-throughs in place, I’ll run a length of wire up to one of the palm trees, and see how well my IC-736 loads. Jim Strickland suggested building a simple crystal radio using a germanium diode, of which I have many in the drawer. Crystal sets are very dependent on a good ground, as I discovered in my distant youth. If I can bring in local AM stations well, I’ll consider the ground a success. The ultimate goal is to get a ground-mounted trap vertical, like the 18-AVT or similar. In the meantime, I know how to get a lot out of 75′ of copper wire worked against a good ground.

And now, for the first time in a fair number of years, I have a good ground!

Odd Lots

LED Strips for Workshop Lighting

60W Bulb Wafer - 500 wide.jpg

We replaced nearly all of the incadescent bulbs in the house with LED bulbs shortly after we bought it in late summer 2015. That came to 27 60W bulbs and ten or twelve 75W floods for ceiling can lights. You can’t get incandescent bulbs in the commoner sizes anymore, and the power savings is considerable. LED bulbs have come a long way in the last few years, and the “softer” light quality levels (3000K and below, most of which were 2700K for us) approximate incandescent light close enough for what we do.

There are a couple of issues with LED bulbs. We bought Feit bulbs in bulk when we re-bulbed all the ceiling fan lights. Two years on, and the Feit bulbs are dropping like flies. I have nine dead but intact Feit 60-watters on my workbench, and two more that I dismantled to see what’s in them. What’s in them isn’t much: A voltage doubler/rectifier board that converts 117VAC to 236 VDC. There’s a disk holding nine LEDs, with two wires down to the power supply. The photo above shows what it looks like when you hacksaw the plastic globe off a Feit 60W equivalent LED bulb. It’s unclear to me whether the nine LEDs are single diodes or blocks of several fabricated together. It seems like a stretch to put 26 volts on a single LED and not see it emit plastic instead of light.

I’ve been taking bulbs apart to try and see why the Feit bulbs die so young. I’ve pulled two apart: One had a bad power supply. The other had a bad wafer. The wafer, however, was intermittent: Tap it with a screwdriver and it flickers, and sometimes comes up to full brightness. The dead power supply was just dead, without any indication of why. It stayed dead when tapped, unlike the intermittent wafer. Cheap crappy manufacturing, I’d guess. This is one Feit I will gladly walk away from.

LED lighting is problematic in ham radio work because of the broadband noise generated by the bulb power supplies. Fluorescent tubes have the same general problem. My notion is to create a separate lighting system in my workshop/ham station using LED lamps run straight-on at 12VDC. I had hoped that the wafers ran at 12VDC or 24VDC, so that I could harvest them from bulbs with failed power supplies. Not an option.

So I started sniffing around to see what sort of lamps are available for 12VDC. I bought a couple at a hamfest to play around with, and talked to the techs at a lighting store up in Kierland. They had an interesting display: Assemble-it-yourself LED strip lights. These consist of an anodized aluminum U-channel, with a self-adhesive strip of LEDs stuck to the bottom of the channel, with a linear plastic lens that snaps into the U-channel. The LED strips take 12VDC, and use 2.88W per foot.

LEDTapePackage - 500 wide.jpg

The LED tape strips come on a reel, with 16.4 feet on the reel and 3 LEDs per inch. The reel isn’t cheap; I paid $235 for it, and that’s about what they go for on Amazon. What I did was buy an 8′ section of channel/lens and put down just under 8′ of LED strip. The strips have clearly marked points every inch where you can cut them with an ordinary scissors, leaving solder pads on each side of the cut.

LEDTapeCloseup-500 Wide.jpg

The strip comes with a .215″ female barrel connector on the end of 6′ of 2-conductor cord. But again, there are solder pads every inch, so you can wire them to a power source any way you want to. What I did (at least for testing) is dig around in my Big Box o’ Wall Warts and found a Dell APAC-1 power supply, which came with a Dell matrix printer someone gave me ten or twelve years ago. It’s labeled for 12VDC @ 2A, and the strip draws 1.92A, so the supply is working pretty hard. (It squeals, way up there where Carol can hear it and I can’t.)

What I did with the strip is mount the four clips that came with the U-channel under the front edge of the first shelf above my workbench, and then clipped the U-channel to the shelf. The lower surface of the shelf is 11″ above the bench, so I’d have to do some bending and stooping to actually see the LEDs. And the intensity of the light is marvelous, shining down right where I do the sort of close work that electronics requires, which these days is real damned close.

Illimuminated Bench - 500 Wide.jpg

Because the light comes from a strip of 288 LEDs, there are basically no shadows anywhere under the strip, unless you completely block the light. This means that you can work in good light without worrying as much about your hands casting shadows on what you’re doing. It’s almost like the project photos in old QSTs, where all parts of a complicated hand-wired chassis are completely illuminated. The photo below is of a high-voltage power supply placed on the bench beneath the LED strip, and is literally what you’d see were you sitting at the bench poking at the supply.

Lit Chassis - 500 wide.jpg

This was only a first step. The strip won’t be powered by the APAC-1 long-term. I have a 30A 12VDC supply that I built out of an old minicomputer power supply somebody gave me. That will be the power source for all the lighting in my workshop/shack once the whole system is complete. I’m looking into overhead lighting now, and may simply use the remaining 8′ of LED strip on the reel with a white diffuser lens, clipped to the drywall ceiling.

Ultimately I want to work up a solar panel system on the roof of the garage, charging a 12V battery of some sort to supply lights and radios. The landscapers are going to auger a hole next to the shack for an engineered ground system tomorrow morning, so I have other work to do before I get on the air. It was a fun project, and will make working on projects a great deal easier. Good light is not optional!

Rant: Long Weeks and Short Ribs

NuTone-500 Wide.jpg

It’s good to keep on learning new things, no matter how old you are. I learned something new over the recent holidays: You can break a rib coughing. The good news is that although I did run the experiment, the results were inconclusive.

Whew.

It may have been a near thing; my cousin Dolores told me she “popped a rib” years ago while fighting bronchitis, and it was nasty. Another online friend said basically the same thing. And my workout friend Joe told me that a dump truck T-boned his convertible back in 2001 and broke four ribs before driving several glass fragments into his skull. The glass was no big deal. The ribs…very big deal.

This, as they say, has been a bad season. Carol has had the sniffles or worse since Thanksgiving. I’ve done better, but I think both of us came down with the endlessly popular flu between mid-month and Christmas. We had our shots, even, for all the good they did us. I bounced back, for the most part. She had a terrible time climbing out of it. And then, just after New Year’s Day, we both ended up with some bacterial bronchitis. Cough isn’t my typical symptom for colds and flu. Chest congestion and especially sinus congestion, but cough? Rarely.

This time I coughed so hard I thought I’d broken a rib. My right side was horribly painful for most of a week. And that’s when nothing else was going on. When I coughed, it hurt hideously. When I sneezed–and I rarely sneeze only once–it may have been the worst pain I’ve felt since my kidney stone twenty years ago. It may, in fact, have been worse than my kidney stone. I do not ever recall coughing that hard, ever, nor hurting that bad while coughing. My sister was the one who generally had croup. Me, I threw up. She was the Phlegm Queen. I was the Barf King. 1959 was the Year of Body Fluid Eruptions. It’s been better since then.

Until New Year’s Day. Then, as Leeloo would say, Bada-boom!

Urgent care gave me antibiotics, a steroid nose spray, and advice to get a chest X-ray if things didn’t quiet down in a few days. Things didn’t. So I got the X-ray. And even after a 10-day course of Augmentin, my head was still draining and my ribs still hurt like hell. The only good news was that my ribs remained intact, despite two weeks of abuse.

So, why all the TMI? I’ve been away for several weeks, and that’s why. Even after I felt better, Stuff Was Piling Up. I gave us a Ring Video Doorbell for Christmas. I discovered after the fact that it was not compatible with the 1995-era NuTone intercom/door chime that came with the house. When I pulled the NuTone unit off the kitchen wall, I saw what you see in the photo above. Loads of wires, none marked, some just hanging loose out of a hole in the wallboard. It took three days to work up the intestinal fortitude to pull out my VOM and start the necessary detective work. I eventually identified the wires:

  • Two were 18VAC from the doorbell transformer. Good; need that.
  • Two were 18 VAC going…somewhere. They were intended to trigger the gate unlock solenoid, as I discovered when I pressed the gate unlock button with the meter on the wires. Alas, we do not have a gate unlock solenoid. I was sending 18VAC somewhere out into the Vasty Deep. I still don’t know where the other ends of those wires are, though I have some hunches.
  • There were two old-style four-conductor phone cables running out to the gate doorbell button and the front door doorbell button. Two conductors in each cable were hanging loose in the air. Call me fussy; I don’t like wires just hanging loose in the air. Electricity could start leaking all over the house. Thurber’s mother didn’t care for that. Neither do I.
  • We actually have two, count ’em, two front doorbell switches. I thought one was dead. It’s not. We have two doorbell chimes. God knows why, and I may ask Him one day.

Electricity leaking - 500 Wide.jpg

I was still not a well man, and it took me days to get this far. I found a list of Ring-compatible door chimes and picked one up at Home Depot. It was smaller than the NuTone, which meant that I had to drag in the paint from the shed and repaint the dead space around the wire hole. Before I could do that I had to scrape away the silicone caulk that ran all the way around the NuTone, and then spackle everything level again, given that the caulk had not gone gently into any night, good, bad, or indifferent. It took three coats of paint to get full coverage. By then I would ordinarily have begun throwing things, but I didn’t have the energy to throw things.

The door chime I bought can play a lot of tunes. It can play “Happy Birthday to You.” It can play “The Star-Spangled Banner.” It can play “We Wish You a Merry Christmas.” As I punched my way through the tune stash, I began to despair of it ever playing ding-dong! like any proper doorbell should. Ding-dong! was there. It was the very last tune in the chime’s repertoire. Guys, if I want jazz I’ll go to New Orleans. If I want classical I’ll turn on KBAQ. If I want shitty MIDI compositions of no special quality, well, I know where they live. You have one job: Play ding-dong! Just do it.

Ok, by then I was grumpy. If your ribs felt like my ribs did, you’d have been grumpy too.

I dissected the NuTone circuit board. It has a number of ICs on it:

  • A 4N33 optocoupler.
  • An MC14585BCP hex Schmitt trigger.
  • A 555 timer.
  • An SA800 doorbell chime generator.
  • A TC4066BP quad bilateral switch.
  • A ULN3718M audio amp.

I had several of all of these in my parts stash but the door chime generator and the audio amp, which (being a dedicated LM386 guy) I wouldn’t use anyway. So the damned thing could offer me no useful parts for my trouble. Worthless crap, you are. Feed the trash, you did.

With all that done and out of the way, let me say that the Ring doorbell works beautifully. When somebody pushes the button, the Ring app pops up on your smartphone, wherever you are, and shows you a video of who’s at the door. You can then talk to them through the speaker on the Ring device. They can’t tell if you’re home or not. The damned thing even has night vision. I had to practically pay a rib to get it installed, but trust me: It’s worth the trouble.

I mentioned here that our waterbed sprang a leak a week or so before Christmas. We bought the bed at a Going Out of Business sale, which means that the retailer had gone out of business, and the manufacturer didn’t seem especially healthy itself. So we ordered a new waterbed mattress from a place that makes them up custom. It showed up a little less than a week ago. I finally got it installed and filled this afternoon. With a little luck we’ll sleep on it tonight.

Through all this, I got half a chapter of Dreamhealer written, and no Contra entries. I am still tired, still blowing my nose twice as often as is my habit, and still coughing occasionally. You don’t need to feel sorry for me; it’s been in the 70s and 80s here while most of my friends are freezing their cans up north. The dogs are clean and I cooked us a helluva good steak this evening.

Oh, crap. I forgot: The pool backwash valve is leaking. The pool guy says the pool equipment is now 25-odd years old, and could fail badly at any time. I got one quote. I need another. And then I will have a much thinner checkbook.

Hey, Happy New Year!

More or less.

I guess.

[coughs fitfully]

The Other Fry’s

Sure, you’ve got Amazon Prime. (I do too.) But I have something that (most of) you don’t have: Fry’s Electronics. It’s a 12-mile drive from here, so I can’t just dash over anytime I want, like I can to Artie’s Ace Hardware. However, I realized after stopping in after a 15-year hiatus the other day that I need to go there more often.

Fry’s is hard to describe. It’s a double-big box store, done up in Aztec decor to look something like a pyramidal temple. It’s the ultimate nerd supply house, and has everything you might expect: motherboards, memory sticks, power supplies, cases, monitors, hard drives, Flash drives, software, and so on. Want to build your own desktop? It’s all there. However, Fry’s is remarkable for going even deeper into the wild country of the word “electronics,” right down to resistors and capacitors, soldering stations, shrink tubing and wire in any color you could name, and aluminum chassis. Good lord, they even have panel meters. Tools, wow: multitesters of every sort, needle-nose pliers, dykes (sorry; I still call them that), Dremels, Internet cable connector crimpers, and on for page upon page.

It gets a little nuts after that: toys, kites, CDs, DVDs, candy, all kinds of snacks, light bulbs, night lights, swamp coolers, refrigerators, camping gear, CB radios (!!), and fifteen varieties of fidget spinner. There was a display of something I truly don’t understand: body shapers (which is I think the generic term for things like Spanx) printed to look like bluejeans. Yes, I know, there are plenty of women nerds…but underwear in a resistor shop?

Crazy world.

Why was I there? I’ve noticed over the past year that the Mozilla codebase has grown ever more memory-hungry. Waterfox has taken to gagging with just six or seven tabs open. I’ve been meaning to add more RAM to my quadcore for some time, on general principles. It started out as an XP machine, and so had a scant 4 GB since I bought it. Now I had an excuse. Windows 7 Pro 64-bit can manage 192 GB of RAM, so throwing 16 GB at it is no big deal. But since I dropped those sticks into the quad, I haven’t heard the least little feep out of Waterfox.

Excellent prices, overwhelming selection, and people in the aisles who know what they’re talking about. Still another expression of the boggling richness of Phoenix’s retail sector. Fry’s Electronics is legally unrelated to Fry’s supermarkets, but was created by the sons of the man who founded the supermarket chain. If you’re ever in town for some reason, make sure you go over there. If you do, call me and I’ll come along.

Buy some hot pink shrink tubing. Dare ya!

Odd Lots

LED Bulbs, RF Noise, and a Crazy Idea

Carol and I were in Costco last week, stocking up on consumables (everything from toilet paper to Hoody’s Peanuts) when we spotted something that made me do a double-take: a package of four Feit LED dimmable 60W equivalent light bulbs for $10. I’ve never seen them for less than twice that. We grabbed a pack to try at home, because our new house here contains a lot of 60W bulbs.

How much of a lot? There are nine Hampton Bay ceiling fan/lamp fixtures, each holding three 60W bulbs. (We found later that the fixture over the dining room table had three 75s in it.) That’s 27 bulbs right there, plus another twelve or fifteen in bathrooms and outside light fixtures. Figuring 40 60W bulbs, that’s 2,400 watts. Granted, not all of them are on at once, and several fixtures (like the one in the guest room and the two outside on the patio) are rarely on at all. However, there are another eighteen 65W ceiling floods, so I’m guessing our typical evening use is about 2,500 watts overall. It adds up. If bulbs are now as cheap as Costco was offering them, I was ready to jump.

A sidenote: There was some sort of utility company instant rebate, so the register price was about 1/3 less than the package price. Outside the Phoenix area, your prices may (and almost certainly will) vary.

This being Arizona, there was a thick layer of brown dust (over and above the dead bugs) on the lamp globes and on the existing bulbs themselves. We ran three loads of lamp globes through the dishwasher because their spatter finish tears threads off the ScotchBrite pad by the sink. I put three bulbs in the fixture in Carol’s office, then stood back to gauge the quality of the light.

Marvelous! Three $2.50 LED bulbs gave brighter and slightly whiter light for a total power draw of 28.5 watts. We went back to Costco and bought 24 more, plus a test pack of 65W equivalent LED ceiling floods. I spent a day on a ladder swapping out bulbs, and although the ceiling floods aren’t all done yet, we’re looking to cut our lighting power draw to 1/6 of what it would be on incandescents.

This isn’t all about money. It gets hot in Phoenix in the summer (duhh!) and the heat that you pay for when you light your bulbs you then have to pay to pump out of your house with the AC. Ok, so maybe it is all about money. In some respects, LED bulbs are a twofer.

Now, there’s a downside. Both CFL and LED bulbs require power at entirely different voltages than incandescent lamps. Every bulb has a little power supply in it, and to keep the power supply circuitry small, the supply uses a technology that generates a lot of RF noise. If the whole house is running LED bulbs, I’m guessing that my IC736 will deliver audio that sounds like the center of a raging thunderstorm, only 24/7. I don’t have my shack wired up yet, but it’ll be interesting to see what happens when I run a temporary longwire out to the pool shed later this year.

Now, it won’t happen this year and perhaps not next year, but the 5-year plan includes a new building in the NW corner of our 5/8 acre lot to house my workshop and radio shack. (I’m using the small garage for now, and although I was clever and got everything in, it’s…cramped.) I’m sure I’ll hear our LED bulb symphony (and perhaps the neighbors’) but if I don’t use LEDs or CFLs in the shack, things may be a lot better.

So…what are the chances of opening up the bulbs, pulling out or bypassing the power supplies, and running them at the LEDs’ native voltage? This isn’t an idea original with me, and in fact one chap has a very nice article up on Instructables. The 40W bulb he dissected delivers 30VDC to its LED array, and he had to do some major surgery to rewire the array to take 12VDC instead. My approach would be to figure out what DC voltage a given type of bulb generates for its LEDs, and then build a high-current passive (i.e., non-switching) power supply to deliver exactly that voltage to all the modded bulbs in the building. (Note that there’s nothing magical or standard about his 30V figure. That’s just what the maufacturer happened to use in that particular model of bulb.) This would require running a separate 30VDC (or whatever) power network inside the workshop building, but since it’s going to be a custom building, I can do that.

We’re not nearly done with the house and landscaping here yet, and I won’t have a great deal of loose time until the summer. (We still have work to do on our Colorado house before we sell it.) I’ll start a research binder on LED bulbs in the meantime, and maybe allow myself a few hours at some point to pull a cheap bulb apart to see what its LEDs are eating. If any of you have played around with LED bulb internals, (or have come across any pertinent links) by all means share in the comments. I have a hunch that a lot of very clever guys are pondering this problem right now, and I’m looking forward to hacking the hardware myself. I haven’t done much building in the last couple of years for various reasons, and damn, I miss it!