Jeff Duntemann's Contrapositive Diary Rotating Header Image

Tutorials

How things work and how to do them

Measuring Raspberry Pi USB Power Draw

Smartronix USB Meter.jpg

Most of the problems that turn up while configuring Raspberry Pi systems cook down to inadequate power. The infamous stuttering keyboard problem vanished immediately here when I put the RPi on a stiffer 5V supply. When I bought a second RPi for a programming system, I incorporated a powered hub capable of sourcing 500 ma from each port, and in doing so strangled the power problem in its crib.

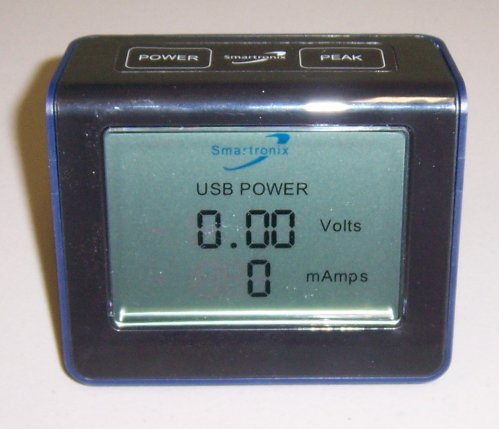
Problem solved, but I still wondered: How much juice do these things actually need? How stiff is the 5V supply? I’m a bench tech, and not being able to do actual measurements made me nuts. So I sniffed around a bought a test instrument for measuring voltage and current at a USB port under load. It’s the Smartronix USB Power Monitor, model ST034TT05-01-001. I bought it from CyberGuys; $49.95.

It works like any current meter: You connect it between a USB port and a USB device. It simultaneously measures the voltage on the port and the current through the device. There’s a full-size Type A jack on the right side of the box for connecting the load, and a full-size AB cable plugging into a B jack on the left side of the box, which plugs into a Type A port.

Works like a charm. I did the measurements below in about ten minutes:

Raspberry Pi board running Raspbian, w/o Wi-Fi 50-73 ma
Dell 0C8639 wired USB mouse 5-17 ma
Dell SK8135 wired USB keyboard 53-56 ma
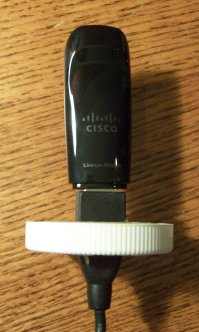
AirLink AWLL5088 Wireless N Ultra Mini USB Wi-Fi 32-80 ma
SanDisk Cruzer Mini thumb drive, 256 MB 27-30 ma
SanDisk Cruzer Micro Skin thumb drive, 256 MB 75-89 ma
San Disk Cruzer Mini thumb drive, 512 MB 7-11 ma
KingMax Super Stick thumb drive, 512 MB 35-62 ma
SanDisk Cruzer Mini 1 GB thumb drive, 1 GB 5-11 ma
SanDisk Cruzer Micro Skin thumb drive, 4 GB 75-91 ma
SanDisk Cruzer Micro Skin thumb drive, 8 GB 43-70 ma

In the readings above, the two numbers are the range across which I saw current run. In most cases, the first number is when the device is idle, the second is when it’s busy. All measurements were taken from the same USB port, one of the four ports on the Rosewill powered hub. All devices tested are USB 2.0, because the meter itself is not listed as capable of testing USB 3 devices.

I have several of most of the thumb drives, and identical models were almost alike in their power behavior. This made me wonder how the Cruzer Minis managed to use so little power while doing the same task that all the other drives did. In this case, the task was copying a 109 MB file (the Lazarus 1.0.6 installer) from the PC to the thumb drive. One would think that smaller drives would draw less current, but not so.

Probably the biggest eyebrow-raiser was how rubbery the 5V USB rail is on my quadcore. An 8GB Cruzer Micro Skin thumb drive pulled the port down from 4.99 v to 4.91 v while drawing 90 ma. The same drive pulled the Rosewill hub supply down by only .02 v , from 5.17 v to 5.15 v while drawing 70 ma. (Current draw in thumb drives is not the same on the RPi as it is on Windows.)

My only gripe about the meter is that “peak” mode displays the highest values for voltage and current, when voltage and current generally move in opposite directions as load increases. So a downward movement in voltage isn’t registered in peak mode.

Other than that, it works as described and answered a whole lot of questions about what sorts of things I can reasonably expect to connect to a Raspberry Pi’s built-in USB ports. Actually, I now recommend using the powered hub for everything, given the RPi’s touchiness about power. It makes the RPi system bulkier and snakier, but a whale of a lot more reliable.

And as for the Smartronix USB power meter, let’s say solidly (if not quite highly) recommended.

The Raspberry Pi Keyboard Stutter Problem

When I first cabled up and ran my Raspberry Pi board, it worked like a charm, first time. I was powering it with the Motorola Droid X2 charger that I had stolen from the kitchen desk upstairs. To keep peace in the valley, I went out and bought a cheap Micro-USB phone charger at Best Buy. It booted normally, but then, when I tried to log in, the keyboard began repeating characters. I’d type in “pi” and see a parade of extraneous i’s march in stately fashion across the display:

piiiiiiiiiiiiiiiiiiiiiiiiiiiiiiiiiiiiiiiiiiiiiiiiiiiiiiiiiiiiiiiiiiiiiiiiiiiiiiiiiiiiiiiiiiiiiiiiiiiiiiii

Needless to say, I couldn’t log in. Now, this didn’t happen every time, but probably half of all logins I attempted failed, with the same keyboard jitter. I tried two other USB keyboards I had on the shelf plus the known-good one attached to my GX620 USFF, and saw exactly the same behavior. It clearly wasn’t the keyboard itself. I’m using a Dell SK-8135 keyboard, which has a 2-port USB hub to which a Dell USB optical mouse is connected. This leaves one USB port on the RPi free, with any luck to use for thumb drive add-in storage. More on that once I figure it out.

Anyway. Some googling suggested a power supply shortfall. I got out my DVM and put the probes on test points 1 and 2. These are minuscule “doughnut” pads on the RPi circuit board. One is labeled TP1, the other TP2. Hunt around on the board for them; it’s not like there are a lot of square inches to search. TP1 is located next to the 220 uF filter cap at the Micro USB jack. TP2 is right next to the yellow RCA jack.

The RPi is designed to work at 5V. Anything much below that and things may start getting flaky. My reading across the test points was 4.72V. Aha! We now have a new phone charger for the kitchen desk–a cool one with a retractable cord–and I decided to dedicate the old one to the RPi. With the original Motorola Droid X2 charger in the wall, I measured 5.03V across the test points. Shazam! No more keyboard stutter.

I’m not sure it’s a question of the RPi drawing more current than the charger can provide. The Droid X2 charger that works is rated 850 ma. The no-name charger that provided only 4.72 volts is rated 2.1 A. Current sourcing ability is important, especially since different USB keyboards and mice draw different amounts of power–but accurate voltage is just as important. I’m guessing it’s sloppy voltage regulation in the cheap charger. If you’re getting keyboard weirdness, put your DVM on the test points and see what your charger is feeding the RPi.

What? You don’t have a DVM? No Pi for you!

Behold the EggMcSpamFin!

EggMcSpamFin-500Wide.jpg

The place is a mess. Not as messy as it’ll be by tomorrow night, but it’s still a mess. The movers got everything transferred to the uncarpeted portions of the lower level yesterday, and the carpeting has been pulled up. Plastic tarps are all over the place. Tomorrow the drilling begins.

lilfrypan200wide.jpgIn the meantime, when Carol and I broke for lunch an hour ago, I tried something completely different. I scrambled a single egg in a bowl, dumped some butter into the little one-egg fry pan that I’ve had for years (left) and with the burner on medium made a scrambled egg disk. I then threw a Bay’s English muffin in the toaster, and while it was toasting I broke open a Spam Single onto a Corelle plate and heated it up to a nice sizzle in the microwave. When the muffin came out of the toaster I buttered it good and proper, threw the scrambled egg disk on a muffin’s lower half, lowered the sizzlin’ Spam Single onto the egg, and then slapped the muffin lid on the whole business.

Damn, that was good! Cheap, too, as lunches go. Eggs are about 20c each. Spam Singles run about a buck. A single Bay’s English muffin costs me about 40c. Might have used a nickel’s worth of butter. Total $1.65. Almost entirely sugar-free. Filled me up completely and will probably carry me all the way to suppertime without any need to snack. It would be less fattening without the English muffin, but try as I might, I can’t do completely without English muffins.

Highly recommended.

A Steampunk Aethernet Concentrator

Concentrator500Wide.jpg

Those who tuned in to my March 18, 2011 entry will recall that I spotted a Star-Rite copper parabolic resistance heater at a consignment store, and brought it home thinking it would make a good Wi-Fi antenna. I put a proof-of-concept lashup together last week and found that it worked very well, even though its diameter is on the low side for 13 cm microwaves. I spent half an hour or so digging through my several bins of odd plastic looking for just the right center insert, and stumbled on a pill bottle that ProbeExposed200Wide.jpgactually pressure-fit into the center hole without any modifation of the bottle or the center hole. (This may seem remarkable if you’ve never seen the quanity of pill bottles and other odd plastic (s)crap I keep out in the garage.)

The Wi-Fi element is a Cisco AE1000 USB 2.0 Wi-Fi adapter, connected to the PC through a 3′ USB extension cable. The female end of the extension cable is glued into a rectangular hole I made in the pill bottle’s white lid with a nibbling tool, and the AE1000 plugs into the adapter cable.

Even with the number of pill bottles I have, finding this particular bottle was a huge break. I still have to figure a way to get the probe fastened into the hole by something better than friction, but that’s just engineering. The bottle works extremely well for another simple but fortuitous reason: It puts the long axis of the AE1000 right where the focus of the copper parabola falls.

I tested for this out in the driveway in an interesting way: I pointed the parabola at the Sun as closely as I could, and then stuck a paper towel tube into the center hole to see where the sunlight would be most intense. The strongest part of the focus is about 3″ from the bottom of the bowl. (I didn’t leave the paper towel tube at the focus for very long, trust me.) This is just about where the AE1000’s antennas sit, if its interior construction is anything like the USB Wi-Fi dongle I sacrified some years back to see how it was done.

FocusTest350Wide.jpgFor as lucky as I got, the position of the adapter isn’t especially critical. We’re not trying to create an image or even intense heat. We’re just trying to concentrate a distant microwave signal on the AE1000, and focus the signal that it emits into a narrower steerable beam. Nor am I going for moonbounce–the real mission of the device is to make sure I can get into the resort Wi-Fi access points when I’m at the Taos Toolbox writers’ workshop this summer. That always depends on where your room is relative to the access points, and in the past, I’ve pulled rooms in dead spots about two throws out of five.

Well, not this time.

Jim Strickland suggested calling it an Aethernet Concentrator, and so it is. (The name of the Wi-Fi adapter is peculiarly appropriate.) I’m not entirely finished yet. I need to paint the pill bottle so that it looks less like a pill bottle, and the copper bowl needs cleaning and polishing generally. But I’ve already tested it, and it increases the strength of my access point downstairs radically. Aiming it up and down the street from here at my desk, it detected nine APs that the naked AE1000 didn’t see plugged into the back of my GX620. (I call this “warsitting.”)

I’m going to do a larger article on the project once I tie the ribbons on it, and I’ll let you know where to find it when I do.

Displaying Wallpaper on One Monitor Only

DualMonitorSetup500Wide.jpg

I got annoyed the other day (finally!) after being annoyed off and on since, well, almost forever. The problem was this: I was following a Web tutorial explaining how to do something in InDesign. I had InDesign up and maximized (as I always use it) and the Web tutorial in a Firefox window. Firefox wasn’t maximized, but that didn’t matter: Each time I selected a menu item in InDesign to tweak a setting, Firefox vanished under InDesign. That’s just the way Windows has always worked, and for a long time (ten years? more?) I was wondering if there were a better way. Tiling is not an option, not if I want to work on spreads in InDesign. So I just kept on keeping on, with Firefox appearing and vanishing as I ticked off steps on the tutorial.

Until this morning, when shadows on the wall told me that the light bulb had appeared over my head. Yes!

I ran downstairs and got an old monitor off the shelf. It’s a 15″ Samsung SyncMaster 570B, bought for Carol in 2003. She used it until I got her a 20″ display a couple of years ago. It has a mount pivot, and can be used in either portrait or landscape mode. I plugged it into the idle VGA video connector on my desktop, and without any fuss I had dual displays.

I’ve done that before to see how it was done, but never had the desk space for two identical (big) monitors. It wasn’t until today that I hit upon the refinement of putting the second monitor in portrait mode, which takes some space but not as much as anything in landscape mode. Now I can put a Firefox window on the secondary display while working on something full-screen on the primary display, without having to rescue the tutorial window from behind the app window each time I do something in the app window. Victory is sweet–and contains no fructose.

One peculiarity: My desktop wallpaper was partially duplicated on the second, lower-resolution display. The wallpaper image is a desktop blotter (complete with stains) and it just looked wrong having only part of it on the smaller monitor. I wanted the wallpaper on the primary display only, with just a blank color field on the secondary. Remarkably, there is no obvious way to do this. I dug around for most of an hour, trying things in both Control Panel’s Display applet and the NVidia control applet, without success. Then I hit upon this article. The gist is this:

  1. Return the wallpaper image setting in Display | Desktop to None; that is, turn off your current wallpaper. Both screens will now have the same blank color field for background.
  2. Select Desktop | Customize Desktop | Web. What you’re going to do is add a static image (the wallpaper of your choice) for Active Desktop, instead of a Web page.
  3. Click New. In the New Desktop Item dialog, click Browse, and select your wallpaper image from wherever it lives. Open it. Click OK on New Desktop Item. Click OK on the Web tab. Click OK on the Display applet as a whole to close it.
  4. The image you selected will be displayed, probably spanning both monitors. (It did on mine.) Hover over the top edge until the Active Desktop title bar pops up. Click and drag the image to whichever minotor you want to have it as wallpaper. When it’s moved completely onto one display, click the maximize button in the title bar. Bang! There’s your wallpaper, on one display only.

Now, as best I know Active Desktop was eliminated from Windows Vista, so this mechanism applies only to XP and (I presume) earlier versions. (Let me know if I’m wrong about that; I have no Vista or 7 instances here.) Active Desktop used a lot of CPU time and memory, but I think that was due to continuous refresh of the Active Desktop HTML and inane things like Pointcast that people have long forgotten. I don’t see any resource hit for having a static image in place of a Web page.

If I see any system flakiness in coming days I’ll reverse the change and let you know, but so far I haven’t seen a downside. I may try other uses of the secondary display, but I also think I may just turn it off unless I need to read a Web page while doing something else on the primary display. We’ll see.

Replacing Bad Caps in a Good Monitor

Samsung214TBadCaps3Cropped500Wide.jpg

About a month ago, my three-year-old Samsung 214T 21″ LCD monitor started flickering so badly that it could induce a seizure in a lump of granite. It’s been my primary monitor for some time and I love it for several reasons, not the least of which is that it’s a 4:3 and has a built-in pivot on the VESA-compatible stand. So if I want portrait mode I can have it, and all of my machines including the older Dells support it at its 1600X1200 native resolution.

I set the ailing 214T aside and swapped in my downstairs monitor (the older and slower but otherwise similar Samsung 213T) followed by some research on repairs. I had a hunch it was bad electrolytic capacitors. Freaky hardware behavior these days has a high likelihood of being bad electrolytic capacitors, for reasons I explain here. And sure enough, a chap on eBay was selling a caps repair kit specifically for the 214T for $14 shipped. I ordered it, and when it arrived in today’s mail I wasted no time getting to work.

Samsung214TBadCaps1Cropped350Wide.jpgThe “kit” is just a Baggie with six caps and a short length of thin wire solder. If you don’t know soldering you’re going to have some trouble. However, the vendor has a very nice tutorial specific to the similar Samsung 204T/214T units here. It helps that we’re dealing with a power supply board and not a logic board, in that power supply board traces are usually big enough to see. Anybody with a spoonful of bench tech experience won’t have any trouble unsoldering and removing the old caps and getting the new ones soldered in. That took me maybe 10 minutes, granting that I’ve been soldering for almost 50 years and had top-shelf bench tech training at Xerox. No, your real problem will be getting the damned thing apart to where you can remove the PC board to work on it. And the first step is the worst: prying apart the two black plastic halves of the monitor’s case. LCDAlternatives suggests a putty knife in their tutorial, and that’s precisely what it took. And even though I’m very good with disassembly (bruising up a customer’s machine was a serious no-no at Xerox) I scratched up the 214T pretty thoroughly just getting into it. Alas, these units were not designed to be repaired.

Two of the six caps on the power supply board were obviously bad (above left) in that they were domed on top, and one had begun to leak. The others had no visible defects, but that doesn’t guarantee that they hadn’t failed, or wouldn’t fail soon. The kit had six, and I replaced all six.

Total time for the repair was about an hour, including disassembly/reassembly. When I got it plugged back in and powered up, it worked like new, including being a little brighter than it had been shortly before the flickering began. (This is in line with what I’ve read about the effects of bad caps on monitors.) All in all I consider it a big win: Absent the repair, the monitor would have been scrap. I might not have bothered on a smaller or older monitor, but this one I feel is exactly right for what I do, and an hour spent giving it a few more years of service was an hour well-spent indeed.

The MacSlow Cairo Clock Black Border Problem

CairoClockProblem.pngI’m slowly coming out from under something very like bronchitis, but I wanted to get this item posted because I see nothing about it online: When Mac Slow’s excellent Cairo Clock is installed under Ubuntu with all the desktop defaults, it does not overlay itself on the background correctly. (See screen shot at left.) This was initially a head scratcher for me, because the very same version of Cairo Clock (0.3.4) works perfectly under Ubuntu 10.4.

What I didn’t realize is that in the process of tweaking Lucid Lynx this spring (before I installed Cairo Clock) I changed the Visual Effects option from None to Normal. The clock requires something in the GNOME desktop visual effects mechanism, and when I changed Visual Effects to Normal instead of None, it worked as expected, clipping to the clock face with a nice transparent drop shadow.

The option is in the System | Preferences | Appearance dialog, under the Visual Effects tab.

Nothing more than that, and not a big deal. I’m posting it in case some other Ubuntu noob has the same problem and can’t figure it out. If I can save some poor guy an hour and some hair this easily, I will.

WordPress Tags and Categories

Contra is moving to its own domain January 1, and will become a WordPress install as of that date. (Posts there now are all test posts and will be deleted before it goes live.) I’ve been studying WordPress and configuring the install to do what I need it to do, and although it’s taken some time and some fooling-with, long-term it will save me a huge amount of effort, compared to the hand-editing I have done now for over ten years.

One of the interesting features of WordPress is that it supports both tags and categories. A lot of people scratch their heads over that, but when I saw it I understood it immediately. Tags and categories both apply a text string to a post. The differences from a content management perspective are minor: Categories are predefined and applied via a drop-down list, but you create tags “on the fly” at post-time. You can use tags and categories interchangeably if you want, but using them together allows an interesting sort of two-axis classification of posts. One axis (best handled by tags) describes what a post is about: politics, religion, publishing, Linux, Wi-Fi, and so on. The other axis (best handled by categories) describes the shape of a post, in the sense of a literary form: idea pieces, reviews, rants, travelogs, memoir, and so on. The increase in precision is delicious: Not all posts about wine are reviews—I’ve done at least one wine rant and will probably do more, and wine travelogs are possible—but if you’re more interested in reviews than in rants, selecting the “reviews” category and looking for the “wine” tag will get you exactly what you want.

Both categories and tags work best when used sparingly. Five hundred tags each used once or twice are not only not as useful as keyword search (which is available in WordPress) but less useful, because after awhile we forget what tags we’ve created and create new tags that are so similar as existing tags as to spawn serious search entropy. (I had this problem on LiveJournal more than once.)

Categories in particular should be few and distinct. I brainstormed with myself a few days ago, jotted down as many category identifiers as occurred to me, and then ruthlessly winnowed the list down to a predetermined limit of ten or fewer. The eight categories I settled on are these:

Daybook: Everyday activities; “Dear Diary:”
Ideas & Analysis: Commentary on news plus ideas and speculation
Memoir: My personal history
Odd Lots: Short items presented without much discussion
Rants: Complaints and other over-the-top material
Reviews: Evaluations of products or services
Travelogs: Where I went and what I saw/suffered/learned in going
Tutorials: How things work and how to do them

I also have a tags list that runs to a little over fifty right now, and includes all the expected keywords describing my many interests, like religion, publishing, ebooks, dogs, hardware, ham radio, psychology, and so on. I spent a sobering half an hour meditating on my accumulated tags list in LiveJournal and threw most of them out. I’m going to try to keep myself to fifty tags or fewer and don’t expect a great deal of difficulty creating the list. (I’ll post it once I consider it reliable.) This sort of thing is called a “controlled vocabulary” in information science circles, and the trick, of course, is to keep it controlled.

LiveJournal will continue to be a mirror. One unanswered question is whether I will attempt to import LiveJournal posts to WordPress. This apparently can be done, though I haven’t tried it and understand that it could seriously mess up my newfound tag discipline—and require me to categorize several hundred posts. I may import but only selectively. Research continues.

Coming -Clean About Eclipse

I got the NASM plug-in installed into Eclipse yesterday, after a tip from Bishop Sam'l Bassett of the Old Catholic Church, who had spotted a forum comment that I hadn't. (The real skill in using the Internet is crafting your search terms.) Eclipse has a plug-in cache, and sometimes you have to empty the cache to get it to refresh its list of plug-ins. I intuit that this function is usually served by exiting and restarting Eclipse, but in my case that wasn't enough.

I got the cache cleared by rebooting the system, and suddenly, there was the plug-in. The forum comment in question also mentioned that you can start Eclipse with the -clean command-line parameter, and Eclipse will start “clean” with an empty plug-in cache. I didn't have to do this, but it's worth knowing.

Otherwise, I had done all the right things. Eclipse doesn't really “install” plug-ins in the sense that we install things in Windows. Unzipping a plug-in archive under the Eclipse plugins directory is all that installation requires, assuming that the archive contains all of a plug-in's necessary elements.

There's still work to be done in configuring Eclipse to develop with NASM (setting paths for the assembler and gcc, and a bunch of other things) but that's straightforward and should be done long since by tonight. I'm going up to SoftPro Books in Denver tomorrow with Jim Strickland, and we'll see what they might have that could be useful getting up to speed with Eclipse. A quick scan of pertinent titles on Amazon indicates that most books are about developing Java apps with Eclipse, but some discussion of the IDE in general terms would be very useful about now.

I have a gripe about Ubuntu that I might as well air at this point. The folders in which you unpack Eclipse plug-ins are owned by root, and unless you're running as root you can't unpack files into those folders. Fair enough. I had hoped that Ubuntu and Gnome would have evolved sufficiently since I last did this sort of thing to just pop up a sudo dialog when the user (and we're all users on this bus; Ubuntu does not really have a root account in the strict sense of the word) attempts to do something that violates permissions. But no; it throws up a fairly useless message and glares at you. To get the job done you have to bring up a terminal or the graphical command line dialog and run “gksudo nautilus” to run Nautilus as root. Installer systems like apt-get don't throw tantrums like that on you; when they need permission to install files in folders owned by root they just ask for your password. Nautilus needs to do that.

After all, I'm the Visual Developer Magazine guy, and I have a fetish: Command lines should never be compulsory. Never. It's 2008. We're supposedly all OS grown-ups now. Fundamental things like file management should be 100% point-and-click.

A Gunk Issue With Eraser 5.7

I'm over at my sister-in-law Kathy's house, taking a look at her Dell SX270 computer, which I installed here last summer. She asked me to look at it because it had suddenly gotten sluggish, and I was prepared to find viruses or spyware. Instead I found a 40 GB hard drive that was 98% full, when the last time I was here it was less than 50% full. That was mighty suspicious, and I ran TreeSizeFree to tell me where all that file space had gone. It had gone into a single folder under C: called ~ERAFSWD.TMP, which was hogging a staggering 21 GB of disk space in many hundreds of very large files.

The ~ERAFSWD.TMP folder, as it turns out, is created every time the free Eraser file shredder app begins an erasing run, and is deleted when Eraser finishes. A week or so ago, the machine's video driver crashed for reasons unclear, and had the bad karma to crash when Eraser was doing its default daily scheduled run erasing unused disk space. So Eraser had never released the temp space it allocated while it was running.

The solution is simple: Exit Eraser (it's a tray app) and delete ~ERAFSWD.TMP. Then (to make it less likely to happen again) remove the scheduled erase run, which is set up by default when Eraser is installed. Eraser is most useful when emptying the Recycle Bin, and installs a Recycle Bin context menu item for that purpose. Unless you work with a great deal of confidential information, daily scheduled free space erasing is massive overkill. I do a free space run on demand every few months.

It was my own damned fault, as I had installed Eraser on this machine last summer without removing the daily scheduled run. Sometimes even a master degunker generates massive gunk. Mea culpa.